Contents
Configurations tab
Within the Configurations tab of Transaction Manager, there are two sections: Automation Settings and Additional Automation Settings
Automation Settings
In this section, you will map a Smart Connect account to a GL account from the QuickBooks Online (QuickBooks Online) or Xero Chart of Accounts.
Once the account is mapped, you will choose from AutoPush, ManualPush, or No Automation.
AutoPush
⚠️ To drive efficiency and aid in risk mitigation we require you to disconnect your client’s general ledger bank feeds when using AutoPush. This will avoid the risk of duplicate transactions posting to your clients’ books, as well as avoiding additional work at month's end as the general ledger bank feed transactions need to be manually excluded.
AutoPush automatically posts transactions from the Smart Connect bank feeds into QuickBooks Online or Xero. Using our Machine Learning models, we predict the payee and category for a transaction. Any transactions that are low or medium confidence will automatically appear on the Needs Review tab for your review.
- Last Updated By column
This column provides audit visibility into the most recent changes to automation settings, showing who made the update and when. The column displays updates made directly in the Configurations tab, as well as through the Add Client Flow and Smart Connect.
Low-confidence transactions will have a red AutoPush icon next to the Category and/or Payee fields; medium-confidence transactions will have an orange AutoPush icon next to the Category and/orPayee fields.
High-confidence transactions will appear on the Processed tab and will have a green AutoPush icon next to the Category and/or Payee fields. If you hover over the AutoPush icon, you will see a tooltip with additional details.
You can also see the confidence level in the transaction details window by clicking the Action button, and then the Details button.
Knowing when AutoPush is Enabled
Accounts connected to AutoPush display an AutoPush icon inline with the financial institution name. Upon expanding the financial institution line, any account in that financial institution connected to Smart Connect will be identified with the same icon.

Additionally, you can see if AutoPush or ManualPush is enabled by opening the configurations tab. The radio buttons will indicate which is on:

⚠️ A Smart Connect connection is required to use AutoPush.
When adding new entities
Once the first AutoPush/ManualPush transactions are ready for review, the Partner Admin who connected the GL, the Client POC, and the TxM Default Assignee will all receive an email notification.
The start date will be when transactions should start “AutoPushing” to the GL. The AutoPush start date can be set to cover transactions up to 24 months in the past.
ManualPush
Once configured, manual push holds all transactions in the Needs Review tab of Transaction Manager as bank feed transactions. These transactions will be automatically categorized, but will not be automatically posted to the GL, regardless of their confidence rating. They will need to be reviewed by a user and manually pushed to the GL.
After the user has reviewed the transaction they will need to take the action to Add to GL & Mark Reviewed, or to Add Transactions to GL (which adds the transaction to the GL without removing it from the Needs Review tab). This can be done on individual transactions, or in bulk by using the checkboxes to the left of each transaction and clicking on the Other Actions bulk button at the top of the transactions list.
- Go to the Configurations tab in Transaction Manager.
- Click the Edit button in the upper-right corner of Automation Settings:
- Select the ManualPush radio button under Push to GL.
- Click Save.
⚠️ NOTE: Be sure to have your accounts mapped, and have a start date set for transactions to begin getting categorized.
Only the Partner Admin role can enable AutoPush or ManualPush
When adding new entities
Once the first AutoPush/ManualPush transactions are ready for review, the Partner Admin who connected the GL, the Client POC, and the TxM Default Assignee will all receive an email notification.
No Automation
We won't automatically categorize or post transactions to the GL. But you can still use Transaction Manager to collaborate on categorizing uncategorized transactions with your team and clients. To enable, simply check the box under No Automation.
Additional Automation Settings
The Additional Automation Settings section is where you can configure additional settings, such as: ML Training Dates, GL Automation, Statement Automation, Materiality Threshold, Default Assignee and Default Settings for Low/Medium Confidence Transactions.
-
The “ML Training Dates" Start Date allows you to set a specific date when the ML models should start training based on the historical GL data. If no date is defined, the models will look at all GL activity. This is useful in case there’s historical data we do not want the model to train from.
-
Users may choose both a start and end date to create a specific range of data to train machine learning.
- When the start or end dates for the machine learning models are changed, the models will retrain immediately. Predictions based on the retrained model will begin within 24 hours.
-
-
The GL Automation setting is the recommended approach for accounts not connected in Smart Connect. All transactions posted to these accounts will be processed daily. Any transactions requiring review will appear on the Needs Review tab. To ensure processing, transactions must be added to the GL. To learn more, jump to GL Automation.

- The Statement Automation setting is the perfect option when a PDF statement is the only way to obtain transactions. It automatically extracts transactions from the uploaded statement, so they can be added to the GL and categorized by our AI. If a match is found, no new transaction will be posted.
-
- A GL holding account must be assigned. The extracted statement transactions will be posted there temporarily before the AI processes them. You can select one in the Statement Automation Holding Account field.
- PDF statements must be uploaded to the appropriate “Bank Statements” folder in the client’s account—either directly from the folder or via document upload task.
- Transactions will appear for review within 24–48 hours in Transaction Manager.
- Please note:
- As transactions are processed, the account is reconciled in Auto Bank Rec using our standard matching logic, automating the full transaction lifecycle.
- When extraction confidence is low, the Botkeeper team will manually review transactions before they are posted.
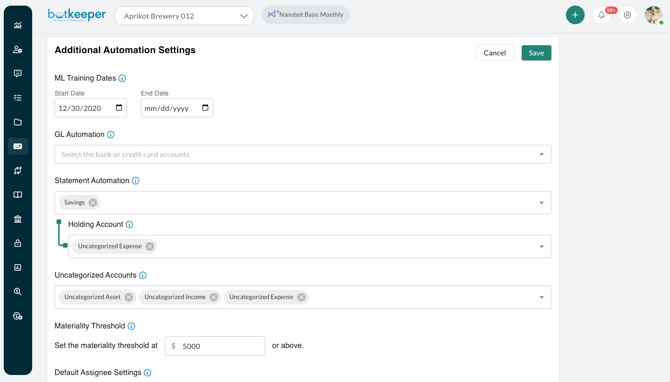
- The Uncategorized Accounts setting allows you to exclude accounts from machine learning to help improve the accuracy of your future automated transaction categorizations.
-
The Materiality Threshold allows you to set an amount where all transactions greater than or equal to a certain amount will automatically post to the Needs Review tab for further review.
-
The Default Assignee Settings allows you to select a user that should be assigned to all transactions on the Needs Review tab.
-
The Settings for Low/Medium Confidence Transactions allows you to select a default category and payee to which all low and medium confidence transactions should be posted. For example, you can post all of these transactions to “Uncategorized Expense” and “Uncategorized Vendor.” If these settings are not configured, the transactions will post to the category and payee that the ML model predicted.

When each automation type runs
The AI runs daily at 7am EST. This includes all automation methods (AutoPush, ManualPush, GL Automation and Statement Automation). After any automation method is enabled for the first time, it will run the following morning at 7am EST, and will then run daily at the same time.
This action will:
- Sync the respective transactions to the client’s GL
- Move the transactions from the Needs Review tab to the Processed tab
⚠️ IMPORTANT! On the Needs Review tab, you will find a button marked Apply Automation at the top of the transactions list. You can use this button to run the automation on demand, if you don't want to wait.

When your automation is done running, you'll see this message:

Using the Apply Automation button has no effect on the regularly scheduled automation indicated above.
Choosing the right Automation
Option 1: GL Automation (If the accounts are already connected in the QuickBooks Online/Xero GL Bank Feed, then this is the preferred method)
- Account Connected to GL (QuickBooks Online/Xero) Bank Feed
- Credentials are required to establish a connection in the GL bank feed. This can either be third-party credentials the client sets up for the firm, or the client’s primary credentials.
- Note: Some institutions (Bank of America for example) do not allow the third-party credentials to connect. Connections must use the client’s primary credentials.
- Note: If the firm does not have the credentials and you do not want the client to set up the connection in the GL, you will need to choose another option.
- Note: If you still wish to use GL Automation, but the account isn’t connected in the GL (or can’t be connected), you may upload a .csv file of transactions to the GL:
- Firm or their client will need access to the transactions in .csv format so they can be imported into GL.
- This requires credentials to access the bank. This can either be third-party credentials the client sets up for the firm, or the client’s primary credentials. If access is unavailable, the client will need to provide the .csv file.
- Note: If the firm does not have the credentials and they do not want the client to provide the .csv file, they will need to choose another option.
- Credentials are required to establish a connection in the GL bank feed. This can either be third-party credentials the client sets up for the firm, or the client’s primary credentials.
Once GL Automation is enabled, Botkeeper will ingest new transactions from the GL every day at 7am ET and categorize them. Any transactions needing review will be on the Needs Review tab in Transaction Manager, where they can be updated. Users can then select Mark Reviewed to sync them back to the GL.
Option 2: Smart Connect (If the accounts are NOT connected or can’t be connected in the GL Bank Feed, then this is the preferred method)
- The institution needs to be supported by Mastercard Data Connect.
- Credentials are required to establish the connection. These can be primary or third-party credentials set up by the client for the firm’s use.
- Note: Some institutions (Bank of America for example) do not allow the third-party credentials to connect. Connections must use the client’s primary credentials. Major Institutions with Specific Setup Suggestions
- If the client doesn't wish to share their credentials with the firm, there are two options to establish a Smart Connect connection:
- Invite client into the Botkeeper platform as a user so they can establish the connection themselves; OR
- Send the client a Smart Link (No Botkeeper login required) so they can establish the connection themselves.
Once Smart Connect is connected and automation is enabled, Botkeeper will download new transactions from Mastercard Data Connect every day at 7 am ET and categorize them. Any transactions needing review will be on the Needs Review tab in Transaction Manager, where they can be updated. Users can then select Mark Reviewed to sync them back to the GL.
Option 3: Statement Automation (Preferred method when accounts aren't, or can't be connected in the GL or Smart Connect)
- The firm or their client will need access to the PDF bank statement
- This requires credentials to access the bank (third-party or read-only). If access is unavailable, the client will need to provide the PDF statement.
- Note: If the firm does not have credentials and they do not want the client to provide the PDF statement, they will need to choose another option.
Once a statement is uploaded to the account’s Bank Statements folder (either via direct upload or a document upload task) Botkeeper’s OCR extracts the transactions and posts them to the designated GL holding account. Transactions remain there briefly while the AI processes them, beginning immediately after the statement is processed. The entire process is completed within 24 hours of the statement being uploaded. Once complete, transactions will appear in the Needs Review tab of Transaction Manager, where you can review and edit them as needed.
Some scenarios for choosing your connection:
- Account can be connected in Smart Connect, but is already connected in the GL via bank connection
The options listed below are in order of preference:- Option 1: Use GL Automation for transaction categorization and Smart Connect for statement downloads ONLY. Take care when using this approach NOT to enable transaction categorization in the Transaction Manager Configurations tab, or duplicates might result.
- Option 2: Use GL Automation for transaction categorization and don’t connect Smart Connect*
- Option 3: Connect Smart Connect for transaction categorization and statement downloads. This configuration requires the GL Bank Feed(s) to be disconnected.
- Account can be connected in Smart Connect for transactions, but not statements (and is not currently connected in the GL). Connect Smart Connect for transaction categorization (Option 2 from the section above).*
*To use Auto Bank Rec, you will need to manually upload the statement to the corresponding bank statement folder within the Documents module. - Account can’t be connected in Smart Connect and is currently connected in the GL via bank connection.
Use GL Automation for transaction categorization (Option 1:1 from the section above).*
*To use Auto Bank Rec, you will need to manually upload the statement to the corresponding bank statement folder within the Documents module. - Account can’t be connected in Smart Connect, and is currently being imported into the GL via CSV uploads
Use GL Automation for transaction categorization (Option 1:2 from the section above)*
*To use Auto Bank Rec, you will need to manually upload the statement to the corresponding bank statement folder within the Documents module. - Account can be connected in Smart Connect and is currently being imported into the GL via .CSV imports
The options listed below are in order of preference:- Option 1 - Connect Smart Connect for transaction categorization and statement downloads.
- Option 2 - Use GL Automation for transaction categorization and Smart Connect for statement downloads.*
- Option 3 - Use GL Automation for transaction categorization and don’t connect Smart Connect. * **
*.CSV imports are highly manual; we always recommend prioritizing a connection over an import.
**To use Auto Bank Rec, you will need to manually upload the statement to the corresponding bank statement folder within the Documents module.
Connection Quick Reference
|
|
Smart Connect Only |
GL Automation Only |
GL Automation (for transactions) and Smart Connect (for statements) |
Statement Automation Only |
|
Institutions |
Requires institution to be supported by Mastercard Data Connect |
Requires institution to be supported in the GL via bank feed connection or .CSV file imports |
Requires institution to be supported in GL and Smart Connect |
Does not require institution to be supported in Smart Connect or GL |
|
Access |
Requires partner access to credentials or willing to have client set up connection |
Requires partner access to credentials or willing to have client set up connection or provide .CSV files |
Requires partner access to credentials or willing to have client set up connections |
Requires partner access to bank statements or willing to have client provide statements |
|
Transaction Categorization Frequency |
Daily |
Bank connection: daily .CSV import: as often as the imports occur |
Daily |
Based on statement period or as often as imports occur (monthly, quarterly, annually). |
|
Statements |
Downloadable if supported by Mastercard Data Connect. Otherwise, requires user to upload the statement. |
Downloadable if supported by GL. Otherwise, requires user to upload the statement. |
Downloadable if supported by Mastercard Data Connect. Otherwise, requires user to upload the statement. |
Does not require statement downloads to be supported. |
|
GL Bank Rules |
Does not require rules |
Requires rules |
Requires rules |
Does not require rules |
|
Uncategorized Accounts |
Does not require using an uncategorized account in COA, but may be referenced as a holding account to prevent AI/ML learning |
Requires using an existing uncategorized account in COA or creating a new one |
Requires using an existing uncategorized account in COA or creating a new one |
Requires using an existing uncategorized account in COA or creating a new one |
|
Data Sources |
One |
One |
Two |
One |
Note: Since a client can have multiple accounts, it’s possible to have accounts using different options. For example, they may have an account using Smart Connect for transaction categorization and statement downloads, another account using GL automation only for categorization and no Smart Connect and/or another account using GL automation for transaction categorization and Smart Connect for statement downloads.
Train Your Model Tab
Train Your Model allows users to layer firm-specific instructions on top of Botkeeper’s AI predictions, creating a hybrid model that combines machine learning with user-defined logic.
At least one ingestion method (Smart Connect, Statement Automation, or GL Automation) must be enabled.
⚠️ This feature is not a replacement for Botkeeper’s categorization model—it’s an augmentation. You can enforce firm-specific logic to fine-tune your model, especially for complex allocations or new entities with limited GL history.
Key capabilities:
-
Add rules based on transaction attributes (payee, amount, description, date, etc.) to define how transactions should be categorized or allocated.
-
Allocate transactions across multiple categories, classes, or projects (by percentage or amount).
-
Assign transactions to specific users or hold them for review.
-
Combine “money in” and “money out” logic in a single rule.
-
Run automation on demand with the click of a button.
-
See when logic has been applied to a transaction, and when it has been broken.
Key Features
-
Custom rules layer – Users define logic that applies alongside Botkeeper’s ML predictions.
-
Complex allocations – Split transactions across multiple accounts, classes, or projects.*
-
Condition flexibility – Build rules using transaction attributes, including vendor, amount, date, and type.
-
Role-based setup – Rules can be configured by SP, partner, or CSS users.
-
Transparency – Users can see when logic is applied or when a rule is broken.
-
On-demand execution – Apply logic instantly with a manual trigger.
-
Unified workflow – Transactions surface in Transaction Manager with applied rules clearly indicated.
-
Protected visibility – Logic is hidden from client users, ensuring firm-level control.
⚠️ You can only split transactions by project and class if you have project or class tracking enabled in your GL.
When to Use Train Your Model
In most cases, Botkeeper’s AI models are powerful enough on their own—delivering accurate, high-confidence categorizations without extra setup.
Train Your Model becomes especially valuable when you need added control or customization, such as:
-
Assigning classes or projects to transactions
-
Splitting transactions across categories, classes, or projects
-
Onboarding new entities with little or no GL history
-
Working with frequent low-confidence transactions
-
Excluding specific transactions from automation
-
Setting customers on deposits
-
Routing transactions to a firm user for review (e.g., above a dollar threshold, from a specific vendor, or checks)
-
Performing cleanup and catch-up work, where you can apply rules retroactively to reclassify existing GL transactions in bulk
Using Train Your Model
- Choose the Train Your Model tab within Transaction Manager.
- Click the green Create Logic button in the upper right of the screen.

- You will see the following screen:

- Enter a name for the logic.
- Choose whether the logic will apply to Money In, Money Out or Both.
- Choose the account (or choose All Accounts).
- Choose whether you want Any or All conditions (which you'll set up next) to be met in order to apply the logic.
- Click +Add Condition.
- Choose to identify transactions by Description, Amount, Transaction Type, or Date.
- Indicate the modifier for your transaction description:
- When Description is chosen as the transaction identifier:
Contain, not contain, or equal exactly the text you'll type into the final box on the Conditions line - When Amount is chosen as the transaction identifier:
Be greater than, less than, equal to, or not equal to a dollar amount - When Transaction Type is chosen as the transaction identifier:
Be a deposit or purchase - When Date is chosen as the transaction identifier:
Be of a specific date ("is"), between two dates ("is between"), occur monthly between the 1st and 31st ("monthly is between days"), or on a particular day of the month (monthly is on day).
- When Description is chosen as the transaction identifier:
- You may continue to add conditions if needed.
- Click the Test Logic button to see the transactions that will be affected by your logic.
You will now set the Then conditions of your logic. This is what will happen to transactions that meet the conditions you've set. You can choose to Set and assignee, payee, and/or category when your conditions are met. You can also choose +Add A Split to split the identified transactions by category, project, or class (if project or class tracking is enabled in your GL). You can +Add line as needed.
 Instead of choosing to Set information about the transactions, you can opt to Exclude those transactions from the GL. Excluded transactions will be moved to the processed tab, but not posted to your client's GL.
⚠️ You can only split transactions by Amount when your conditions are set to identify transaction of an amount Equal to.
Prioritizing logic
Once you've created more than one logic instance, you might find cases where it makes the most sense to arrange them to run in particular order; you can easily increase or decrease a particular logic's priority by clicking the arrows next to the Priority column as shown below.

Expanding a logic line
On the main page of your Train Your Model tab, your saved logic will show an expansion arrow to the far right.

Click this, and a drawer will open to reveal the conditions of the logic:

Editing, Deactivating, or Deleting Logic
The Action button (three dots) on the right side of the logic's line will open the ability to edit, deactivate, or delete that logic:

Edit logic opens the full settings for your logic so you can make changes:

Deactivate logic retains your logic for later use, but turns it off. Deactivated logic will not execute once this is selected, until/unless it is reactivated.
Delete logic removes the logic from your list of saved options. It cannot be recovered.
Finding transactions affected by Train Your Model
On the Needs Review tab, you'll find a filter allowing you to select just the transactions where logic was applied, as well as one excluding transactions in which logic was applied:

Transactions benefitting from Train Your Model logic have a green lightbulb indicator next to the attribute defined by the logic:
