Contents
Understanding User Roles
To streamline access to information and ensure security, Botkeeper provides for the assignment of different user roles, each of which has specific access and function privileges. The full list of permissions required to view or act in different areas of the platform are summed up on our User Permissions page. Keep these in mind when inviting a new user to the platform; you'll be choosing their role when you invite them. Keep in mind that your own user role may restrict the role you can assign to others.
- Partner Admin
Has the highest level of access to manage the firm and client's data and Botkeeper features. - Partner Ops
Can view, invite, and manage Partner Ops, Client Admin, and Client Ops roles. Has access to same Botkeeper features as Partner Admin except Partner Ops can’t delete a task, deactivate users, edit partner details, upload partner branding or reset 2FA. Partner Ops users can also see the names of Partner Admin users in the Users table, but cannot see Partner Admin details or action anything for those users. - Client Admin
Has the highest level of access to manage their entity. Client user roles don’t see the names of Botkeeper service providers or any other content that links back to Botkeeper. - Client Ops
Has same permissions as Client Admin except Client Ops can’t manage users or view other user’s tasks. Client user roles don’t see the names of Botkeeper service providers or any other content that links back to Botkeeper. - Client Self Service
Has same permissions as Partner Ops, but cannot add or terminate clients. This role can also fully manage all transactions throughout the platform, view all tasks and projects, and configure automation settings and connections.
How to add users
The person who set up your subscription will receive a user activation email that will prompt them to create their user in their portal. This user will be provided with in-app guided enablement to invite additional users to their portal. You may also reference the following details to learn how to invite additional users into your portal.
Inviting a new user to Botkeeper
You can invite a new user to your portal at both the partner (your firm) or client level. During the invitation process, you can designate the User Role and client access settings. There is no limit to the number of users in the platform.
-
Navigate to the Client & User Management module
-
Click on the Users tab
-
Click on Invite User button
-
The below window will display:

-
Enter the user(s) email address(es)
-
Select user role (Partner Admin, Partner Ops, Client Self-Service, Client Admin, Client Ops)—different roles come with different permissions. You can visit the permissions page to help you choose the appropriate role for your invitee.
-
The Partner field will default with your firm’s name
-
Provide the correct level of access; there are three options
-
Give access to all current clients of your firm name
-
Give access to all future clients of your firm name; or
-
Select the specific clients you want the invited user(s) to have access to
-
Click the Invite button
-
-
Your user will now receive a user activation email to get their user set up and activated in your firm’s portal
⚠️ NOTE! If you send an invitation you want to revoke for any reason, you can do so:
Click on “Action” (...) and select “Delete Invite.” This option can be used if an incorrect invitation was sent and is no longer needed for the unauthenticated user.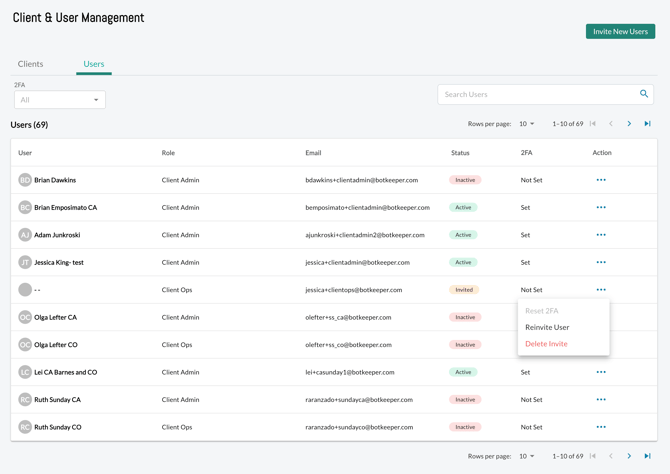
Please note, user invitations expire after 7 days. Should a new user try to activate their account after the invitation has expired, they will need to contact their accountant/portal administrator to be re-invited into their portal
Add an existing Botkeeper user to a client
- Navigate to the Client & User Management module.
- Click on the Users tab.
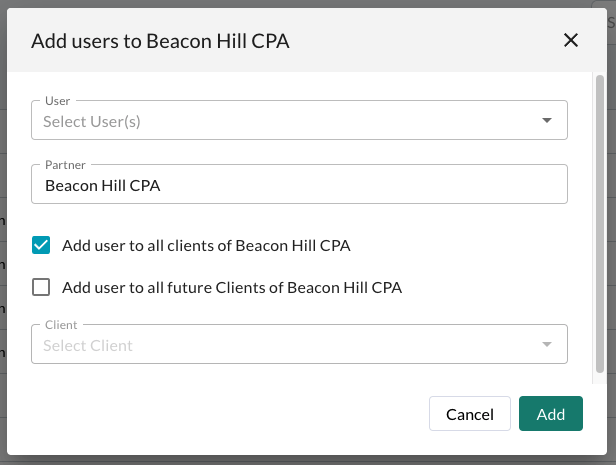
- Click the Add User button.
- The window shown below will pop up:
- Enter the user(s) email address.
- The Partner field will default with your firm’s name.
- Provide the correct level of access; there are three options:
- Give access to all current clients of your firm name
- Give access to all future clients of your firm name; or
- Select the specific clients you want the invited user(s) to have access to
- Click the Add button.
- Your user will now receive a notification that they have been added to the client (if they have their email or in-app notifications turned on).
As you add a new user to an entity, Client & User Management will offer you a pop-up message to let you know if they are already assigned to one or more entities. This allows you to confirm if you still want to add the user.
View Users/User Status
- To view a list of current users click the Users tab from within Client & User Management..
- The Users tab opens to a list of all users, their roles, email, status, 2FA setting and action options.
- Order any column (except 2FA and Action) by clicking its header. Click twice to order the column in reverse.
- Options available to you under the Action column are role-dependent.
Admin users will receive an email when a new user has been invited into the platform:

Deactivating and Reactivating Users
If a user is set to be deactivated, the portal will prompt you to assign any of their tasks, documents, or account ownerships to a new user (only one person can be selected to inherit; if tasks need to be redistributed, you can do so in Work on a per-task basis). If the user had no assigned tasks, documents, or account ownerships, the portal will simply allow you to deactivate them with no further information.
When reactivating a user, you can choose to grant them the same access and roles they had previously, or select new ones.
How does it work?
Whether you need to deactivate or reactivate a user, you will need to visit the “Users” tab within the Portal Manager Module. Deactivated users will no longer be able to log in, or complete any work in the portal.
To DEactivate a user:
- Use the search bar to locate the user’s name, or scroll the list to find them.
- You may either open the user’s profile and click the “deactivate” button in the upper right hand corner of the profile; or you may click on the action menu (ellipses) to the far right of the user’s name in the list, and select “Deactivate User” from the drop-down.
- The pop-up screen will confirm the user’s name you’ll be deactivating. If the user had any assigned tasks, documents, or account ownerships, you will be prompted to reassign all of them to a new user.
- If the user had assigned tasks, documents or account ownerships, select a user from the drop-down list to reassign these to. Note: You may only choose ONE user to inherit these items during the deactivation process. If you wish to distribute tasks to multiple users, you will need to visit the “Work” module and reassign those tasks as desired. Otherwise, the inheritor will be assigned ALL the deactivated users tasks. Click “next,” then confirm the deactivation.
- If the user had no assigned tasks, documents, or account ownerships, you will simply be asked to confirm the deactivation.
If a deactivated user was listed as a client's Point of Contact (PoC), you will need to adjust this in the Details tab of the Portal Manager for the respective client(s).
To REactivate a user:
- Use the search bar to locate the user’s name, or scroll the list to find them.
- You may either open the user’s profile and click the “reactivate” button in the upper right hand corner of the profile; or you may click on the action menu (ellipses) to the far right of the user’s name in the list, and select “Reactivate User” from the drop-down.
- The pop-up screen will ask if you would like to reactivate the user with their previous role and clients, or select a new role and clients for them.
- If you wish to return the user to their previous role and clients, select that option and click “reactivate.”
- If you wish to assign a new role and/or clients to the user, select that option and click “reactivate.” This will prompt a new pop-up that will allow you to elect the new role and clients for the reactivated user. Click “reactivate.”