Contents
- What is Transaction Manager?
- What machine learning predicts for each transaction
-
How Transaction Manager handles reconciled transactions for QuickBooks Online and Xero
- Finding and working with Transaction Manager
- Indicators/Icons
- Filtering transactions
-
Editing and working with transactions and journal entries
- Splitting a transaction
- Bulk editing transactions
- Bulk editing: "Other Actions"
- Editing a journal entry
- Recording a transfer
- Adding transactions to the general ledger
- Add or update Payee or Category
- Excluding a single transaction
- Approving a transaction
- Matching transactions
- Exporting transactions
- Using the Apply Automation button
- The Configurations tab
- FAQs
Transaction manager is only available for QuickBooks Online and Xero users at the moment.
What is Transaction Manager?
It's the heart of Botkeeper's automated bookkeeping. Using AI and machine learning, our platform starts off categorizing transactions with high accuracy. But hold on, because it learns from your input, increasing its accuracy over time. The platform informs you of transactions it's unable to categorize with 98% confidence. You can then review and categorize the transaction, training the machine so it can be done automatically next time. Pretty cool, huh?
AutoPush in Transaction Manager combines best-in-class artificial intelligence and machine learning to ensure transactions are accurately categorized and posted to the general ledger. This takes the bulk of the work off your plate by eliminating traditional challenges with categorizations — opening the door for your firm to achieve its goals.
The result is rapidly processed categorizations, always up-to-date financials, maximum efficiency, beyond-human accuracy, and fewer interruptions for you and your clients!
What machine learning predicts for each transaction
Currently, our models predict the payee for purchase transactions and the category for both purchases and deposits. If your client’s package includes class tracking, our BotOps team will handle assigning classes.
![]()
- At least 50 purchase or deposit transactions in the GL
- Transactions must include payee, category, and descriptions
- Transactions must fall within the ML training period (defined under the Configurations tab)
- The blue banner will disappear.
- An email notification will be sent to the Partner Admin who connected the GL, the Client POC, and the Transaction Manager Default Assignee.

⚠️ When a change is made to ML training dates that causes you to be ineligible for custom models, you will receive a pop-up notification prior to saving the change; the notification explains that transactions will be processed using global models until enough data is available for client-specific models.
How Transaction Manager handles reconciled transactions for QuickBooks Online and Xero
- QuickBooks Online allows Botkeeper to edit reconciled transactions via the API. This allows you to update transactions even after the reconciliation has been completed.
- Xero does not allow Botkeeper to edit reconciled transactions via the API. As a result, reconciled transactions will be disabled in Transaction Manager until they are marked unreconciled in Xero. Once marked unreconciled, they will become editable in Transaction Manager.
Finding and working with Transaction Manager
To access the Transaction Manager feature, follow the steps below:
- In your left navigation, click Transaction Manager and you'll see the following screen:

- You may sort the following columns in ascending or descending order: Date, Source, Type, Payee, Description, Amount, Category, Customer/Project (QuickBooks Online only), and Class.
- Finding Transactions that need firm Input: To find transactions that need your input, click on the Needs Review tab. This will provide you with all transactions Botkeeper needs input on.
- Finding Processed Transactions: Clicking on the Processed tab will provide you with a list of all transactions that have been marked as reviewed.
- To select one or more transactions, click the checkbox to the left of the desired line(s). Your selected transactions will now appear in a list above the main transactions table along with all the transactions’ attributes. You can deselect transactions in this list individually by clicking the red X under the Action column to the right of each transaction in this list, or deselect them all by using the Clear All button near the top of the list. Selected transactions can be expanded or collapsed by clicking Show Selected Rows, and Hide Selected Rows options.

QuickBooks Online Users:
If you have Customer/Project enabled in QuickBooks Online, you will see a Customer/Project column on your transaction display. If you have Class enabled, you will see a Class column on your transaction display.
Xero Users:
If you have Tracking Categories enabled, you will see a Class column on your transaction display for this information.
Action menu options (three dots to the right of each transaction) on the "Needs Review" tab
For Bank Feed Transactions:
- Comment: Leave a comment on the transaction
- Details: Slides a drawer from the right side of the screen providing the description/memo, vendor history, and a detailed audit log.
- Find A Match: Opens the Find A Match modal
- Edit: Opens the edit modal, allowing you to edit qualifying transactions (note Edit will not be available for transactions that cannot be edited).
- Exclude: Exclude the transaction from the GL if you do not need it. This action is usually only necessary if the transaction has already been recorded in the GL via a different method, such as .csv uploads.
- Add to GL: Adds the transaction to the GL, taking it out of the Bank Feed state
- Add to GL and Mark Reviewed: Adds the transaction to the GL, taking it out of the Bank Feed state, and moves the transaction from the Needs Review tab to the Processed tab.
For General Ledger Transactions:
- Comment: Leave a comment on the transaction
- Details: Slides a drawer from the right side of the screen providing the description/memo, vendor history, and a detailed audit log.
- Edit: Opens the edit modal, allowing you to edit the transaction
- Reset: Delete the transaction from the GL, or un-matches the transaction, allowing a user to take additional actions on the transaction, such as: Find a Match, Exclude, or Add to GL.
- If the transaction synced directly from the GL, the reset option will not be available.
- If the transaction is a Bank Feed transaction that was added to the GL, but not marked reviewed, selecting Reset will remove the transaction from the GL. However, the transaction will remain on the Needs Review tab as a Bank Feed transaction.
Supported transaction types
QuickBooks Online: Supported Transactions
- Expenses (can view and edit)
- Expenditures (can view and edit)
- Checks (can view and edit)
- Deposits (can view and edit)
- Credit Card Credits (can view and edit)
- Journal Entries (can view and edit)
- Transfers (can view and edit)
- Bills (can view and edit)
- Bill Payments (view only)
- Note: Bill Payments get their categorization from the bill
- Invoices (view only)
- Invoice Payments (view only)
-
- Note: Invoice Payments get their categorization from the invoice
- Sales Receipts (view only)
- Vendor Credits (view only)
- Purchase Orders (view only)
- Credit Card Payments (view only)
- Sales Tax Payments (view only)
- QuickBooks Online Payroll Types (Payroll Check, Tax Payment) (view only)
⚠️ NOTE! With the addition of credit card payments, sales tax payments, payroll check, and tax payment transaction types in QuickBooks Online, you no longer need to use ManualPush because we can now match to these transactions automatically. However, if you use certain third-party apps, such as Expensify, that sync transactions to the GL, we recommend you continue to use ManualPush to avoid issues.
Xero: Supported Transactions
-
Spend Money (can view and edit)
-
Receive Money (can view and edit)
-
Transfer (can view and edit)
-
Bill (can view and edit)
-
Invoice (view only)
-
Payment (view only)
-
Credit Note (view only)
-
Manual Journal (can view and edit)
- Checks (can view and edit)
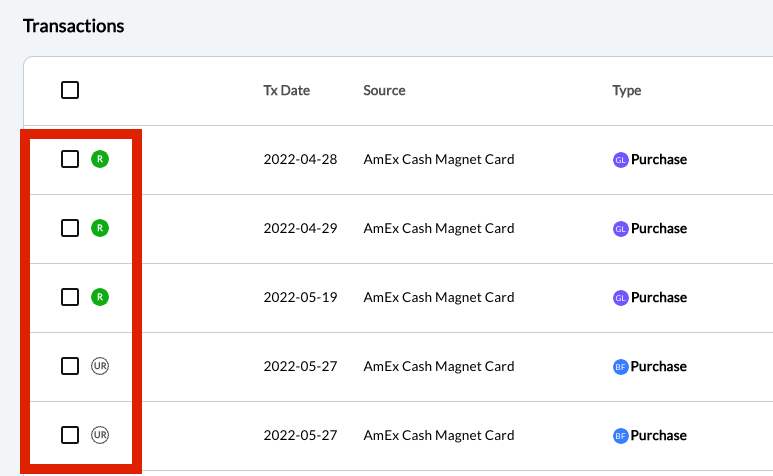
Indicators/Icons
Bank Feed and General Ledger Indicators:
Each transaction now has an inline indicator representing whether it is a bank feed transaction (BF) or a general ledger transaction (GL).
A BF transaction is a transaction that is sitting in the bank feed and has never been posted to the general ledger.

A GL transaction is a transaction (AutoPush or human-added) that has been posted to the GL; or a transaction that originated from the GL by a bill, invoice or journal entry.

Reconciled/Unreconciled Indicators:
There is now an indicator on each transaction to inform users whether a transaction has been reconciled ("R" in a green circle) or remains unreconciled ("UR" in a white circle) within the client's general ledger.
Note: for Infinite-only clients the reconciliation process will remain the same as it is today; whereby you are managing it directly in your client’s general ledger. Having Botkeeper integrated with your clients’ books allows the indicators to update as your clients transactions are being reconciled in their general ledger.
Confidence Level Indicators
A confidence level rating is our solution's level of confidence in our own accuracy.
This ensures that we're providing an interactive and transparent experience into what's happening under the Botkeeper hood, and empowers our firm client to help 'train' the machine as to how to improve on the details of the data in the future. Once transactions have been submitted, we take action based on the confidence level:
There are three different confidence values, which lead to the following actions:
 High confidence (98%+) - transactions are automatically categorized, pushed to GL and show up on the Processed tab in Transaction Manager.
  Medium confidence (90-97.9%) - transactions are automatically categorized, pushed to GL and show up on the Needs Review in Transaction Manager.
 Low confidence (0-89.9%) - transactions are automatically categorized, pushed to GL and show up on the Needs Review tab in Transaction Manager.
Learn more about how confidence levels work with our AutoPush functionality HERE.
Match Indicators
To learn more about matching, visit this article.
 Shown on the Needs Review tab, this indicates a Bank Feed transaction has not been matched. Click the icon, then Find a Match to manually search for one.
 Shown on the Needs Review tab, this indicates the number of potential matches found. Click it to reveal the potential matches. You can also manually add a match by clicking the icon and then selecting Find a Match.
  Shown on the Processed tab, Indicates a transaction has been matched. Clicking it will display the transaction(s) to which it matched.
Filtering Transactions
On the Needs Review tab and Processed tabs, There are nine filters: Transaction Type, Date Range, Source, and Assignee. AutoPush Confidence Level, Transaction State, Reconciliation Status, Potential Matches, and Matched Transactions. You can see all the filter options available, even after selecting an option. Secondary filtering will respond to the option selected in the primary filter.

You can use the search bar on the left-hand side of these tabs (look for the little magnifying glass) to search for specific transactions within the table.
Note: You can search by any details available within the table.
Editing and working with transactions and journal entries
The date and time of the last time your list of transactions was synchronized with the GL is displayed at the top right of the list. You can click Sync with QuickBooks Online/Xero to get the newest update.

Editing a single transaction from the "Needs Review" tab
Category, Payee*, and Assignee entries can all be edited by simply clicking them on the transaction line itself, If the client uses Class and Project tracking, these can also be edited in-line. Alternatively, you can also click the Action Button (three dots) to the far right of the transaction, and choose Edit.

This will open a window displaying the transaction details. From here, you can:
- Add or edit check numbers and dates, which will sync back to your GL automatically
- Indicate if a transaction is billable (QuickBooks Online only)
- Track the customer and project if enabled in your general ledger.
- Add or edit a memo/description, category, class, or customer/project.
- Split transactions
When editing a General Ledger (GL) transaction, users have the option to Save Changes or Save & Mark Reviewed. Save & Mark Reviewed eliminates the need to navigate back to the main table to complete the review process:

When editing a Bank Feed (BF) transaction, users have the option to save their changes using Save Changes, or save changes and add them to the general ledger at the same time using the Add to GL button in the lower right of the Edit Transaction pop-up screen—the transaction will remain on the Needs Review tab. Choosing Add to GL & Mark Reviewed eliminates the need to navigate back to the main table to complete the review process. The transaction will be added to the GL and removed from the Needs Review tab.

You may need to RESET a GL transaction before editing. Once the reset is complete, you can then take additional actions, such as: edit, match or exclude.
For transactions associated with a check, you will also be able to edit the check date and check number.
*If using QuickBooks Online, the Payee field may be left empty. When using Xero, in order to take the Action to Add to GL or Add to GL and Mark Reviewed, Payee will need to be populated.
Splitting a transaction
To split a transaction:
- Find the action button
 to the right of the transaction and click it.
 - Select Edit. You will get a pop-up window that looks like this.

- Click the +Add Row button highlighted below:

- Fill-in the necessary information. If you choose to split by percentage, the amount will update automatically. If you choose to split by amount, the percentage will update automatically.*

- Choose Save Changes or Save Changes & Add to GL as highlighted in the image below.
- Save Changes (only available for GL transactions) - Saves your changes. The transaction remains in the needs review tab, and will not be posted to your client's general ledger.
- Save Changes & Add To GL (only available for BF transactions) - Saves your changes. The transaction will post to your client's general ledger.

Congratulations, you split your transaction! In the main screen of Transaction Manager, your transaction will now show Split in the Category column.
NOTE: To see how THIS particular transaction is split, follow steps 1 and 2 above.
Splitting Deposit Transactions (QuickBooks Online Only)
QuickBooks Online clients can also split a deposit transaction in the exact way outlined above, and designate your payees:
In the Edit modal of Transaction Manager, deposit transactions display a Payee column defaulting to the same payee set in the main table. When splitting a deposit, users can add a different payee to each line item, allowing them to categorize their deposits directly within Transaction Manager.

Above: The Payee column location.

Above: A row has been added to split the transaction, and the user is selecting the Payees.

Above: The deposit has been split and all payees and categories identified.
Bulk Editing transactions:
You can select multiple transactions for simultaneous editing. On the Needs Review tab, click the checkboxes to the left of the transactions you wish to edit. This will create a running list at the top of the screen of all the transactions you've selected.
Your choices for editing the transactions you've selected depend on what combination of transactions you have:
Bank Feed (BF) Only Transactions:
You will see the following buttons/options
- Cancel - Exit out of bulk edit.
- Save Changes - Save edits and keep transactions on the Needs Review tab.
- Add to GL - Will bulk add BF transactions to the GL, but leave in the Needs Review tab.
- Add to GL & Mark Reviewed - Will bulk add BF transactions to the GL and move them to the Processed tab.
Combination of Bank Feed (BF) and General Ledger (GL) transactions:
You will see the following buttons/options:
- Cancel - Exit out of bulk edit.
- Save Changes - Save edits and keep transactions on the Needs Review tab.
- Save & Mark Reviewed - GL transactions are marked “reviewed.” BF transactions are added to the GL and marked reviewed.
Note: Some fields, for example check number or description, can only be edited at the single transaction level to avoid conflating transactions.
Bulk Editing: "Other" Actions
Users can also select multiple transactions at once and click the Other Actions drop-down to:
Reset Transactions:
Under the Needs Review tab, remove general ledger (GL) transaction(s) from the general ledger and change their indicator(s) to Bank Feed (BF), allowing them to be excluded from or added to the GL as needed.
Under the Processed tab, moves transaction(s) from the Processed tab back to the Needs Review tab. If the transaction(s) had a purple GL indicator, it/they will be removed from the general ledger, and will now show up in the Needs Review tab with a blue bank feed (BF) indicator.
Exclude Transactions:
Under the Needs Review tab, excludes the BF transaction(s) from the general ledger.
Add Transactions to GL:
Under the Needs Review tab, adds the transaction(s) to the general ledger and changes the transactions’ indicator to GL. Transactions remain on the Needs Review tab.
Add to GL and Mark Reviewed:
Under the Needs Review tab, adds the transaction(s) to the general ledger and changes the transactions' indicator to GL. This also moves the transactions to the Processed tab.
How does it work?
- Click the inline checkboxes to the left of the transaction(s) you want to reset, add, or exclude.
- Click the Other Actions drop-down button at the top right of the transactions table.
- Select the action you wish to apply to all the selected transactions.
Editing a Journal Entry
- In Transaction Manager, the edit button will be enabled for any transaction where type is Journal Entry.
- Once clicked, the edit modal will load, showing the details of the JE.
- Any fields populated in QuickBooks Online/Xero will be visible and can be updated.
- If certain fields are not populated, you will have the option to update details as needed. For example, the "memo" field is an optional field that is not required to be set when a JE is created.
- All updates will be synced back to the GL immediately and can viewed if opening up the JE in the GL directly.
Journal Entry line items are edited like transactions. Simply click the action button (three dots) to the far right of the line, and select Edit from the pop-up menu:

A pop-up window will open with the details of the journal entry:

The Difference must be zero, or you will be unable to save your edits.
Recording a transfer
To process a transfer you can take the following steps:
- Navigate to Transaction Manager.
- Locate the Transaction.
- Navigate to the Action column for that transaction.
- Click on the
 icon.
icon. - When the drawer for the transaction opens, click on the Record A Transfer tab.
- Complete the From and To accounts accordingly.
- Enter a Memo; if desired.
- Click the Save Transfer button.
Your transaction should now be removed from the Needs Review tab and added to the Processed tab, as well as being synced to your client's general ledger.
Adding transactions to the general ledger
To Add to GL, update the Payee and Category”fields as needed, click on the Action button to the right of the transaction, and then click the Add to GL button.
When a transaction is in a bank feed state and not has not yet been added to the GL, a user is able to categorize it and then add it to the GL. You would use this button after a transaction has been reset or if AutoPush detected a potential match and you don't need to match.
To Add to GL, update the Payee and Category fields as needed, click on the Action buttonto the right of the transaction, and then click the Add to GL button
.
Once you’ve clicked the Add to GL button, the transaction will be added to the client’s GL and moved to the Processed tab.
Add or update Payee or Category
To update a transaction’s payee or category on the “Needs Review” tab, simply open the dropdown under “Payee” or “Category” for the transaction and select the new Payee and/or Category that you wish to update the transaction to. As soon as you make your selection for the transaction, the changes will automatically be synced and updated in the client’s QuickBooks Online or Xero account.

Add a new payee
If you need to add a new payee, simply open the “Payee” dropdown and start typing the name. You will see an “Add” option appear that you can click.
If you need to add a new payee, simply open the “Payee” dropdown and start typing the name. You will see an “Add” option appear that you can click.
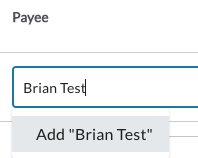
After you click “Add,” a pop-up named “Add Vendor/Payee” will appear, where you can finish adding the name and select the type of payee (vendor/customer). When finished, click the “Save Changes” button.
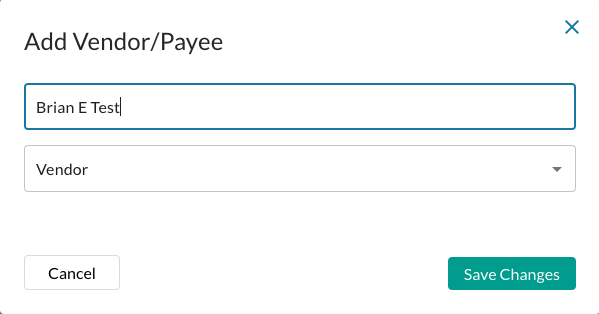
After the changes have been saved, the new payee will be added to the “Payee” field.
Edit a Payee on a Deposit Line Item
For QuickBooks Online clients ONLY: in the Edit modal of Transaction Manager, deposit transactions display a Payee column defaulting to the same payee set in the main table. When splitting a deposit, users can add a different payee to each line item, allowing them to categorize their deposits directly within Transaction Manager.
Above: The Payee column location.
Above: A row has been added to split the transaction, and the user is selecting the Payees.
Above: The deposit has been split and all payees and categories identified.
Excluding a single transaction
Choose a Bank Feed transaction listed in the Needs Review tab, and click the Action button (three dots). Choose Exclude from the drop-down list. This action is usually only necessary if the transaction has already been recorded in the GL via a different method, such as .csv uploads.
Once you’ve clicked the “Exclude” button, the transaction will be moved to the “Processed” tab and you will see “Excluded” text in the “Payee” and “Category” drop down menu.
Resetting a transaction, removing it from the GL
If AutoPush or a user have either added a bank feed transaction to the GL or matched a transaction, you’re able to reset these transactions. Resetting a transaction will delete it from the GL or un-match the transaction which will allow a user to take additional actions on the transaction, such as: Find a Match, Exclude, or Add to GL.
- To reset a transaction, click on the “Action” button: to the right of the transaction:
- Then click the ‘“Reset” button
- Once you’ve clicked the “Reset” button, you will see the transaction on the Needs Review tab.
- When you click on the “Action” button again, you will see additional actions such as "edit", "match" or "exclude.
Approving a transaction
To approve a transaction on the Needs Review tab, check the box on the far left hand side of the transaction and then click the Mark Reviewed button on the top of the table. Once you have selected Mark Reviewed, a green “Transaction Updated Successfully” banner will appear, confirming that the transaction has been approved by you.
Note: You can approve multiple transactions at once by checking the boxes for each transaction and then clicking the “Mark Reviewed” button on top.

Once you have selected Mark Reviewed, a green “Transaction Updated Successfully” banner will appear, confirming that the transactions have been approved by you.

Matching transactions
Matching is the process of linking bank feed transactions to their corresponding GL transactions. The three types of matches are duplicate matches, invoice/bill matching, and undeposited funds matching.
Our AutoPush functionality must be enabled and is required to match bank feed transactions with QuickBooks Online GL transactions. AutoPush technology is what makes this possible!
What matching solves for
It is very common for our clients to require matching for their transaction categorization. Matching is used for preventing duplicates and tracking AR/AP. The five types of matches are: duplicate matches, bill matches, invoice matches, undeposited funds matches and transfer matches.
- Duplicate matches (think of it as duplicate detection): A Smart Connect transaction looks very similar to an existing transaction in the GL. Matching depends on the transaction's confidence level:
- Low/medium confidence: We don’t automatically match these, but indicate them as potential matches using the M icon in the Needs Review tab.
- High confidence: We’ll automatically match the transaction to the one in the GL, which you can find under the Processed tab, with a BF (Bank Feed) indicator. If you click on the M icon next to the transaction, you'll see to which GL transaction it was matched.
- Bill matches (If you are tracking Accounts Payable): A purchase transaction comes through Smart Connect, and we find an existing bill transaction in the GL that has not been paid yet.
- If you choose a match, we create a bill payment transaction and mark the bill paid.
- We don’t automatically match these, but indicate them as potential matches using the M icon in the Needs Review tab.
- Invoice matches (If you are tracking Accounts Receivable): A deposit transaction comes through Smart Connect, and we find an existing invoice transaction in the GL that has not been paid yet.
- If you choose a match, we create an (invoice) payment transaction and mark the invoice paid.
- We do not automatically match these due to the risk of incorrectly marking an invoice paid.
- Undeposited funds matches: A deposit transaction comes through Smart Connect, and we find an existing payment or receipt transaction in the GL posted to the undeposited funds GL account.
- If you choose a match, we create a deposit transaction which reduces the balance in undeposited funds and hits the bank account.
- We do not automatically match these, allowing you to review the transaction for confirmation.
- Transfer matches: Two separate transactions come through Smart Connect on two different accounts that are both using AutoPush.
- We will match and create one transfer transaction.
- When this happens, we automatically match and move the transfer transaction to the processed tab.
- These transfers won’t have the M icon, because it was two AutoPush transactions that we consolidated into one transaction.
- These will sync over to the GL as one transfer transaction.
- Option to configure whether low/medium-confidence transactions should be synced to GL in real-time or held for human review: This will be based on how quickly you want to see transactions in the GL.
- Option to create bill payments and invoice payments when a bill/invoice match is completed: easily handle your AR/AP directly out of Transaction Manager by keeping track of applying payments to open bills and invoices!
- Ability to search the GL & manually match a transaction: AutoPush is really great at finding matches BUT- in some scenarios we find that the amounts between the bank feed and GL transactions may not line up perfectly (for example, due to bulk deposits/one deposit is for multiple invoices). At this point, we’ll prompt you for feedback or assistance to ensure accuracy. If needed, our user friendly interface makes it easy to search the GL and manually match transactions as needed.
- Manually log/record a transfer: AutoPush automatically matches transfers but if you ever need to record one manually, you just choose any bank, credit card or loan account as both the 'to' and 'from' accounts on the transaction.
- Ability to add transaction to GL: If you are leveraging the option to hold transactions for human review, these transactions will need to be added to GL. AutoPush will still auto-categorize the transaction but a human will need to review and add to GL.
- Ability to reset a transaction: If you ever need to make a change to a transaction you can reset it. Once the reset is complete, you can then take additional actions, such as: edit, match or exclude.
Please note, that you only need reset if you want to delete the transaction out of the GL first. If you want to just edit an existing transaction but not delete, you can do that without resetting
- Ability to exclude a transaction: If there is a scenario in which you do not need a transaction synced, you can exclude it! This will mark it reviewed but will not sync to the GL.
Find a match | Transaction Manager
To “Find a Match,” click on the “Action” button to the right of the transaction and then click the “Find a Match” button.
When a transaction is in a bank feed state and not has not yet been added to the GL, a user is able to match it with its corresponding transaction(s) in the GL.
To “Find a Match,” click on the “Action” buttonto the right of the transaction and then click the “Find a Match” button
.
Once you’ve clicked the “Find a Match” button, a window will appear that allows you to search the GL to locate the corresponding match. You can search transactions by Date, Source, Type, Payee, Description, Amount, or Reference Number/Check Number. Find a Match will also return results for unpaid balances when the user searches a corresponding amount.

Additionally, the following columns can be sorted into ascending or descending order by clicking on them: Tx Date, Source, Type, Payee, Description, Amount, Category, Ref#/Check#.
Once you have located the transaction(s) you want to match with, mark the box to the left of the transaction(s) and click the green “Match” button. The transaction will now appear on a list above the main table, which you can expand to see all your selected transactions (Show Selected Rows) or collapse (Hide Selected Rows) to hide them. You can deselect these transactions individually by clicking the red X that appears under the Action column next to the transaction. You can also choose to deselect all transactions by clicking the Clear All button at the top of the selected transactions list. Your selected transactions window will persist as you browse additional pages of transactions.

Note: if you see a confidence indicator next to one of the transactions, that means AutoPush has detected it as a potential match.
Once you’ve completed the match, the transaction will be moved to the “Processed” tab and you will see the word “Matched” in the “Payee” and “Category” dropdowns. You will also see a “Match”button to the right of the transaction. You can click on this button to display the details of the match if needed.

Matched Duplicate Indicator
To aid users in duplication detection when matching transactions, a visual indicator, will appear in the transaction’s drop-down drawer to make the user aware a duplication has occurred. You can hover over the visual indicator to see the details for the duplicated matched transaction.
Exporting transactions
You can now export transactions to a CSV file. Just filter for what you need and export. It's perfect for sharing with clients or reviewing activity across your team or clients.
To export transactions from Transaction Manager to a CSV file take the following steps:
- Enter the Client Name in the Navigate by Client search box.
- Select the Client Name.
- Click the Transaction Manager.
- From the Needs Review tab, use the filters to update the Transactions table for the transactions you want to send to your client.
- Click on the Export to CSV button in the upper right corner of the window.
- Your file will be downloaded to your local desktop.
- Once downloaded, you can send the file directly to your client or update the file to a format that is best suited for your client to review.
Note: Once your client has updated the CSV file or file format you chose to send them, it cannot be uploaded back into Transaction Manager. Manual updates will need to be made for these transactions within Transaction Manager.
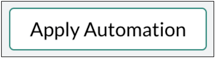
Using the Apply Automation button
Automation runs on transactions in the Needs Review tab daily according to the following schedule:

The Configurations tab
To review the magic behind Transaction Manager, click on the Configurations tab. This will provide you with details on how we are leveraging AutoPush to automate some of the Transaction Manager workflow. If you're using GL Automation, Train Your Model, or Statement Automation, you'll see that here as well. To learn more about the configurations tab, visit this article.
Tasks automatically generated by Transaction Manager
Transaction Manager will automatically create tasks if there are outstanding transactions that need to be categorized. The tasks close automatically when the transactions have been categorized. Tasks are created either weekly or monthly depending on the client’s accounting frequency.FAQs
Why don’t I see any transactions when I launch Transaction Manager from my Outstanding Transactions task?
If the Outstanding Transaction task was reassigned to you by the original assignee, you will not see any transactions when you launch Transaction Manager from your Outstanding Transactions task.
To correct this, re-assign the task back to the original user (you can see who this was in the Audit Log tab of the task). Then, leave a comment for the user asking them to re-assign the transactions they want you to categorize directly in the Transaction Manager module. They will be able to do this in batch, making the process more efficient for them.
Once the transactions are re-assigned to you, the original Outstanding Transaction task will be automatically completed for the original user and you will now be assigned an Outstanding Transaction task to categorize the transactions assigned to you.
When you open the task and click the Go to Transactions button, you should now see the transactions you have been assigned. Once you complete all the tasks and take the action to Mark Reviewed, your Outstanding Transaction task will be automatically completed.
Why don’t I see my payee or category listed in Transaction Manager?
It's there, but you might need to type it in if it doesn't surface with the alphabetized listings.
If the payee and/or category you are looking for exists within your client’s general ledger, they will appear in your payee or category dropdown list in Transaction Manager. To ensure optimal performance, we have limited the number of payees’ and/or categories that appear in the dropdown list to the first 100. If your payee or category name is outside the first 100 listed, then you have the option to type in the payee or category name in the respective dropdown list. This delimit what it returns to only those that match your entered details.
The logic to display the first 100 payees in the dropdown list is alphabetical by payee name.
The logic to display the first 100 categories in the dropdown list is first by alphabetical category and then by alphabetical category name.
Can Transaction Manager be used without AutoPush?
- Smart Connect with ManualPush turned on; or
- GL Automation