After you have activated your user account, walk through the sections below to get your clients added and connected—so you can start enjoying the benefits of the platform!
Client & User Management
Client & User Management is where you can manage the details of your firm, clients and users.
Required details to add a client
Below is the listing of required and optional details to add a client to your Botkeeper portal
- Legal Name
- DBA (optional)
- Primary Industry
- Secondary Industry
- Accounting Software
- Client Point of Contact - User that will be assigned any system generated tasks for this client.
- List of your clients' financial accounts (to determine their eligibility) and their associated credentials
- List of 3rd party applications for non-financial accounts you want to securely store
- One-time and ongoing tasks
Add Client - Infinite
Add Client - Infinite+
Smart Connect
This is where the magic begins! Connecting your clients financial accounts to Smart Connect will allow your clients transactions to be fed into the machine for categorization.
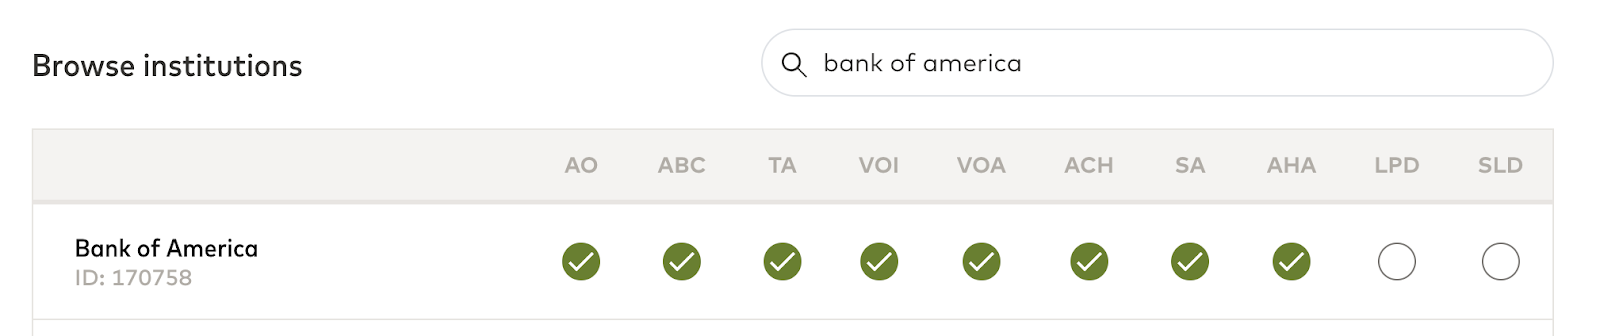
Determine If Your Client's Financial Institution is Smart Connect Eligible
Although Smart Connect offers a multitude of connections, there are some institutions and accounts it does not connect to. Click this link and use the search box to see if your client's institution is supported.
- Type in the name of the institution in the search box:
- A green checkbox in the TA (transaction details) column means you can connect the account in Smart Connect.
- A green checkbox in the SA (statements) column means it supports statement fetching.
Add Your Client's Financial Institution Account
Once you have determined that you have an account that can connect in Smart Connect the next step will be to determine the type of credentials you have to make the connection:
- If you do not have credentials to make the connection yourself, you can either:
- Invite the client in as a user and request that they make the connection; or
- Use the smart link feature, so your client can make the connection without needing to be a user in the system.
- If you do have credentials, you can connect a new bank or credit card in Smart Connect.
Once the connection is made, if statement fetching is supported we will attempt to get the first statement the following month. Each statement that is fetched will be saved in the Documents module under the folder Banks Statements with an associated account and year folder under.
Transaction Manager
For clients with a QuickBooks Online or Xero general ledger, this is where you will manage their transaction categorizations and determine if you want transactions with a 98% or greater confidence rating to automatically sync to your client's general ledger.
AutoPush
Allows the machine to automatically sync your client's transactions categorized with a 98% or greater confidence rating to your client's general ledger.
Enable AutoPush & GL Accounts Mapping
Before enabling AutoPush, it is strongly advised that you disconnect your client's general ledger bank feed transactions. This will mitigate duplicate transactions from occurring and avoid the need for any clean-up work to occur in the general ledger should a duplicate occur.
To enable AutoPush and map your client's smart connect account to the general ledger, take the following steps:
- Navigate to Transactions Manager.
- Click on the Configurations tab.
- In the Smart Connect/GL Accounts Mapping widget, Click the Edit button.
- Complete the following fields for each Smart Connect account:
- GL Accounts - search and select the account from the GL that the Smart Connect account should be mapped to.
- Status - Toggle this to the right to turn it on.
- Start Date - enter the date you want transactions to start flowing from the connected Smart Connect account into Transaction Manager and be categorized by the machine.
- Manual Push - This is defaulted to be turned off. If your client uses a 3rd party application such as, but not limited to an expense management application, POS or Credit Card merchant you may want to toggle this to the right to turn it on. To learn more and determine what is righ for your client click here.
- Click the Save button:

AutoPush Settings
There are additional settings that allow you to customize how the machine will learn and and function for your client. To learn more about these settings click here.
Transaction Categorization
When transactions come through Smart Connect they will get processed by the machine depending on the confidence and your AutoPush configurations. For the transactions that require review, you will find them on the Needs Review tab.
If you need your client’s assistance coding the transactions, you can either:
- Assign the transaction to them directly:
- Your client will need to be an active user in the system to use this option
- By default, your client will get a white labeled email notification letting them know that you need help with a transaction:

If you would like your client to receive a daily or weekly summary email of transaction assignments, or other notification types, you can show them how to change their email notification settings by clicking on the gear in the top right corner of the portal and selecting Notification Settings.

- Create a comment on the transaction and @mention them:
- Your client will need to be an active user in the system to use this option.
- To get to comments, click on the three dots in the Action column on the transaction line, and then click Comment. Once the window opens on the right, you can choose to share the comment with the client (Who can view this comment? checkboxes).

The client will get a white-labeled email notification letting them know that a comment was made on a transaction, with a link to go directly to that comment.
To learn more on how to use Transaction Manager click here.
Password Manager
Securely Store Credentials
Any non-financial account credentials can be added or requested in Password Manager. The advantages of using this feature are:
- Add Credentials - Reduced liability for you and your clients (it is very insecure to share and manage credentials via email, spreadsheets, etc.)
- Request specific credentials from your client user→ unlike other services for credential storage
- Only those who have access to this client in Botkeeper will have access to these credentials. When the client is removed from the system and their data is purged, these details will also be removed along with it → using another third party, you have to manage this manually.
To learn more about Password Manager click here.
Work
You have the ability to create one time tasks or create a monthly recurring project (a grouping of tasks).
To create a project you will first need to create a project template.
To learn more about Work and Projects click here.
Activity Hub
To keep communication organized and streamlined, we suggest that you train your client to communicate with you in the portal through comments on documents, transactions, and tasks.
The Activity Hub allows you to manage all communication throughout the platform. You can use the filters to sort by Clients, Comments To, Comments From, Date, Module, and Status. You can also search across all comments to find the needle in a hay stack.
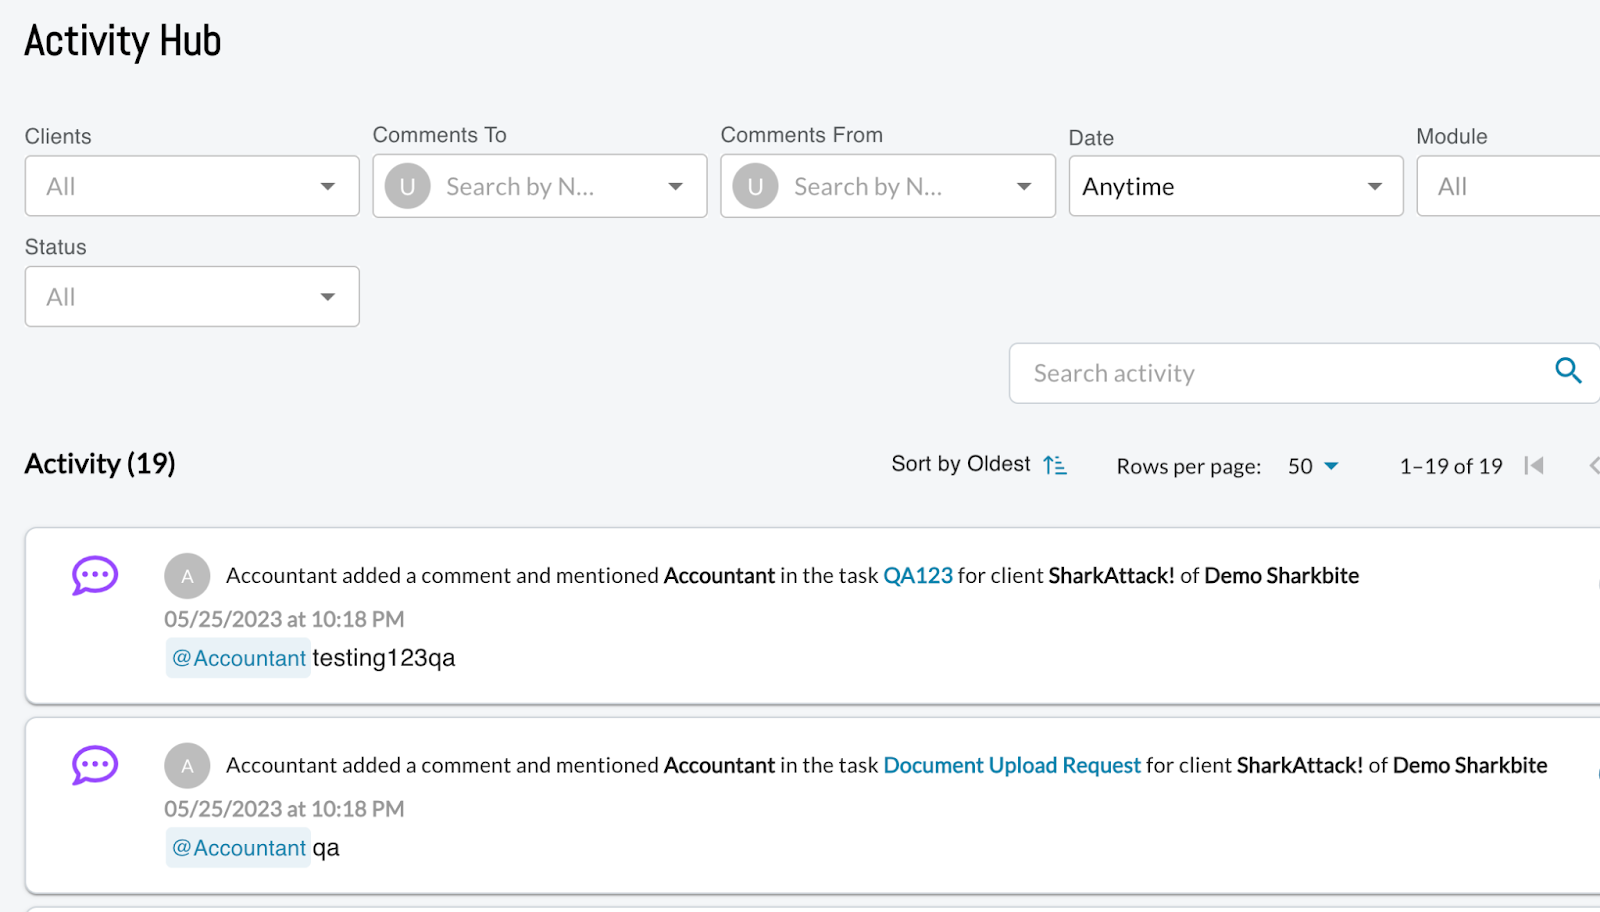
When you find the communication you would like to review or reply to, you can select the name of the task, document, or transaction to quickly navigate to it. To learn more about Activity Hub click here.
Bot Review
For clients with a QuickBooks Online or Xero general ledger, they will get to take advantage of Bot Review. This feature offers exception review throughout the month. Why not give yourself a break and action exceptions as they occur throughout the month vs. month end?
Your client's GL transactions will be run against 13 different exceptions and presented for your review if any fall within those criteria. Learn more about Bot Review and exceptions here.
Go through each exception and triage all transactions until you reach 100%. Mark the period reviewed by clicking Mark Review Complete in the top right.
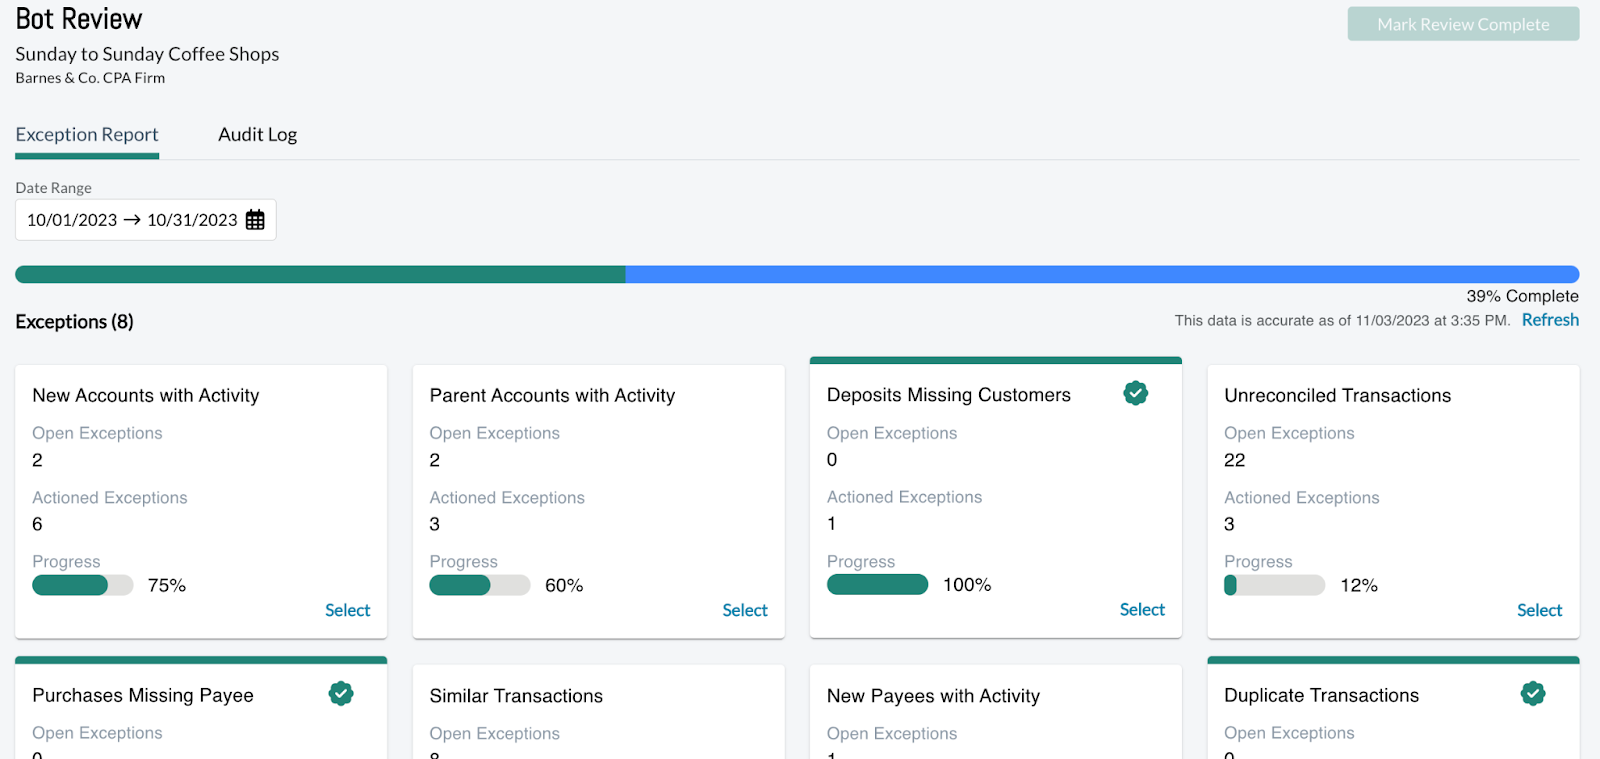
Want to know specifically what happened to those transactions? Click on the Audit Log tab to get an extensive log of each transaction and its lifecycle from bank feed to now → who touched it, what they did, etc. You can also export to CSV if you want!

Sharing Financials
Ideally, ongoing work for you and your client has been added into Projects → this provides transparency to the client and also keeps everything organized and marching toward one deliverable. In this ongoing project, you would have a task assigned to you to upload the management reports for the client. This task should be pointing to the Management Reports folder, which is system generated. Once you run and upload the report to that task, it will upload it to the correct spot.
On the document itself, you can then comment to the client letting them know that their report is available (they must be an active user in the system) and pointing out anything that they should look at specifically. You can do this by opening the file and clicking Comments on the top right corner. If you need to upload a new version of the file, you can click on Versions and drag the new version in.

Additional Support
- Knowledge Base & Help Center

- This is an in-app resource of videos for you to access at anytime and aid you in using your portal.
- The Need Help? button is located to the right of the selected module name from the main portion of the window.
- When the listing of videos pops up, select the one you need from the list and learn away!